Have you ever finished a tutorial, video, or self learning article which teaches you how to code a website? They will help you develop a website on your own computer, but often stop short of actually getting the thing online. And you’re just left hanging!
The good news is – you’ve done the development, and you’ve got yourself a great website. Congratulations! You are awesome!
But the majority of these tutorials don’t tell you how to show everyone else your amazing work. You’re left trying to figure out how to transition what you’ve done on your computer into something other people can use or see.
Then you spend time searching, and you come across things like servers, GitHub, Adobe Dreamweaver, Microsoft Visual Studio, FTP, dashboards, databases etc. etc. Non of which really gives any good indication of how to host them anywhere.
How do I host my files somewhere?
You could do this from your own home-computer, but that would require keeping your computer running and connected to the Internet 24/7. That’s a lot of extra work!
What you need is a web-host
A web host is a service that allows you to make your website accessible via the World Wide Web. You do this by renting space on a server connected to the Internet. The cheapest option for hosting a website on a server is on what’s known as a “Shared Hosting” plan. You share the server with many other websites, like renting an apartment in a larger apartment building. This allows you to share the costs as well. But don’t worry, just like your apartment, only you have the key (or in this case the login details) to access your own files.
There are 1000s of web-hosts out there, so which one to choose? The cheapest web-hosts usually have some drawbacks. The admin interface may be difficult to use, the customer support lousy, the speed of their servers, and hence your website, can be slow.
I have been using DreamHost (affiliate link) for 7 years and have never had a problem with them. With their shared hosting plan I can create as many websites, domains and databases as I wish. They do a 97 day money back trail if you just want to test the waters as well.
Domain
A domain name serves as the online address of your website. Such as http://happybynature.net for this website.
Before you can upload your files you’ll need to take care of some admin on your newly rented server. First you need a domain, secondly you’ll need to add hosting to that domain. This is a web host’s primarily business objective, so it’s usually quite easy to click through.
I’m sure you’ve thought of a great domain name for your website already. With some luck it might even be available. If not, keep trying with different spellings, or change .com into .net, .biz, .eu or any of the many other endings. Just be aware that some may come at a premium price, whereas others are included in your hosting plan, so pick wisely.
On your web host, DreamHost or elsewhere, you will have an option to “Register a New Domain”, “Add Domain” or similar wording.
Hosting
Once you’ve got your domain set up you can add the actual web hosting. Next to your domain name there will be a link or button saying “Add hosting” or similar. This takes you to a form where you set the settings for your server space.
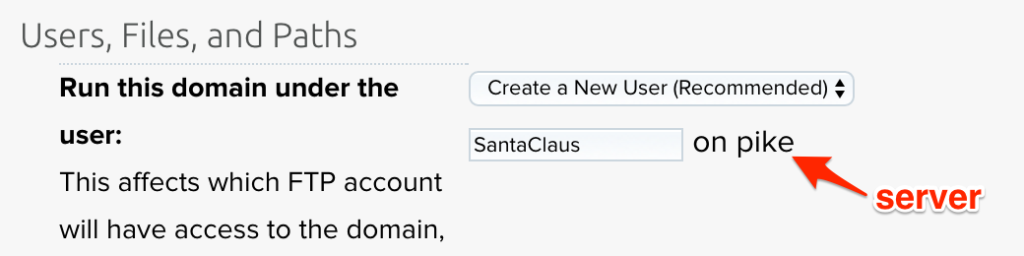
Most of it you can leave alone, but make sure that you crate a unique username and password, and make a note of what these are, as you’ll need it later when you upload your website through FTP. Also make a note of the name of the server, because some hosts will use this name rather than your own domain name when you login with your FTP client. E.g. on my DreamHost it says “Run this domain under the user: [your-username] on pike”, where “pike” is the name of one of DreamHost’s shared servers, so this will most likely be different for you.
Install a FTP client
“File Transfer Protocol”. Transferring files to and from your web host or server is often done with what’s commonly known an FTP client.
If you don’t already have one, download and install a FTP client. FileZilla is a popular free one for both Windows and Mac. If you are on a Mac, Transmit is a very nice polished FTP client, though it costs money.
Upload your website, finally!
In the FTP client fill in:
- Host/Server name
- Username
- Password
You’ll now get a directory of folders on your server, which is connected to the Internet, ready to serve up your website for the world to see!
There are a few different folders there, the one of interest is usually called something like “www”, “home”, “public”, or your domain name.
Open up this folder, select the files and folders making out your website on your own computer, and drag and drop them into the open folder on the server. Wait for the files to finish uploading. Open up your web browser, enter your domain web address, give yourself a well-deserved pat on the shoulder and enjoy your new online website in all its glory!

Caveat: Things won’t always go as smoothly as explained in a blogpost. Everyone’s set-ups are varying, with a different computer, different web hosts, different FTP clients, different settings and so on. But don’t give up! You are 95% of the way there.